

After the food itself, a good knife may be the most useful thing in the kitchen. We use it to trim, prepare, and portion almost everything we cook. Yet the enormous choice of shapes, materials, and finishes can distract us from what matters: comfort, control, and a blade suited to the job. In this two-part series, we will start with materials, construction, anatomy, and edge care. Part II will cover the knives a home cook actually needs.
Long before steel, people made cutting tools from stone, including flint and obsidian. Metal brought new possibilities for shaping, repairing, and maintaining an edge. Modern kitchen knives continue that story with different steels, heat treatments, and geometries. There are specialist knives for almost everything, but you do not need them all. Understanding why a knife has a particular shape is far more useful than collecting every shape available.
Most kitchen knives are steel: iron alloyed with carbon and, often, other elements. Their behavior depends on the full alloy, its heat treatment, and the blade geometry. More carbon can support greater hardness, but hardness, toughness, corrosion resistance, and ease of sharpening involve trade-offs. Chromium improves corrosion resistance. A list of fashionable alloying elements, by itself, does not tell you whether a knife will suit your kitchen.
- Carbon steel can take an excellent edge but needs prompt cleaning and drying to limit rust. A patina is not the same as active rust.
- Stainless steel resists corrosion; it is not completely rust-proof. Edge retention and sharpening difficulty vary widely between alloys and heat treatments.
- High-carbon stainless steel combines enough carbon for useful hardness with chromium for corrosion resistance. The label covers many different steels.
- Clad or sandwich blades use outer layers around a cutting core. The core may be carbon steel or stainless steel, and it determines the care needed at the exposed edge.
Ceramic knives are another option. Their hard edges can stay sharp for a long time, but they still wear and can chip or break. They are poor tools for twisting, prying, frozen food, or bones. Follow the maker’s sharpening instructions; a ceramic blade needs a suitable abrasive and technique.
Construction is another part of the story. A stamped knife starts with a blank cut from sheet steel. A forged knife is shaped from heated metal under force. Stock removal—grinding a blade from a blank—is a separate process, and casting molten metal is not stamping. Forged knives are often heavier and stamped knives often lighter, but neither label guarantees quality. Heat treatment, geometry, fit, and finish matter more than a simple forged-versus-stamped contest.
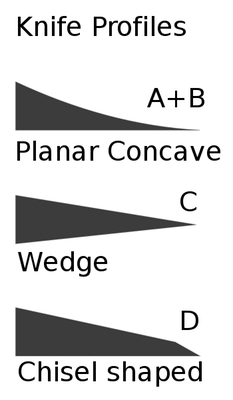
Blade geometry determines how the knife enters food and how well the edge is supported. In the profile diagram, the concave or hollow grind removes material behind the edge, while a convex grind curves outward and can leave more support. A flat or wedge-shaped grind tapers toward the edge. A chisel grind is beveled on one side; it is a deliberate design used in some excellent specialist knives, not a sign of poor quality. Sharpness depends on the final edge, not just the broad profile. Serrations are useful for crusty bread and other foods with a resistant surface, and they are not reserved for cheap knives.
With materials and construction in mind, let’s look at the knife itself. The diagram and table identify the parts you will see discussed in descriptions and reviews. Not every knife has a bolster, rivets, or the same handle construction.
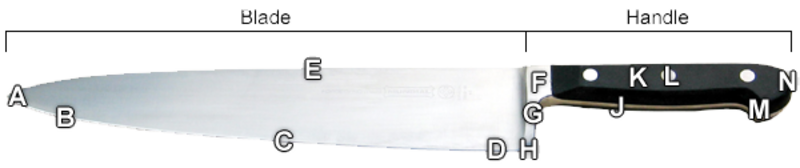
| A | Point: | The very end of the knife, which is used for piercing |
| B | Tip: | The first third of the blade (approximately), which is used for small or delicate work. Also known as belly or curve when curved, as on a chef’s knife. |
| C | Edge: | The entire cutting surface of the knife, which extends from the point to the heel. The edge may be beveled or symmetric. |
| D | Heel: | The rear part of the blade, used for cutting activities that require more force |
| E | Spine: | The top, thicker portion of the blade, which adds weight and strength |
| F | Bolster: | The thick metal portion joining the handle and the blade, which adds weight and balance |
| G | Finger Guard: | The portion of the bolster that keeps the cook’s hand from slipping onto the blade |
| H | Return: | The point where the heel meets the bolster |
| J | Tang: | The portion of the metal blade that extends into the handle, giving the knife stability and extra weight |
| K | Scales: | The two portions of handle material (wood, plastic, composite, etc.) that are attached to either side of the tang |
| L | Rivets: | The metal pins (usually 3) that hold the scales to the tang |
| M | Handle Guard: | The lip below the butt of the handle, which gives the knife a better grip and prevents slipping |
| N | Butt: | The terminal end of the handle |
The tang is the part of the blade that extends into the handle. A full tang runs through much or all of its length, while other designs use a narrower hidden tang. Both can work well when properly designed and assembled. Look for a secure handle without cracks, movement, or gaps rather than assuming that one tang style is automatically safe and another is automatically weak.
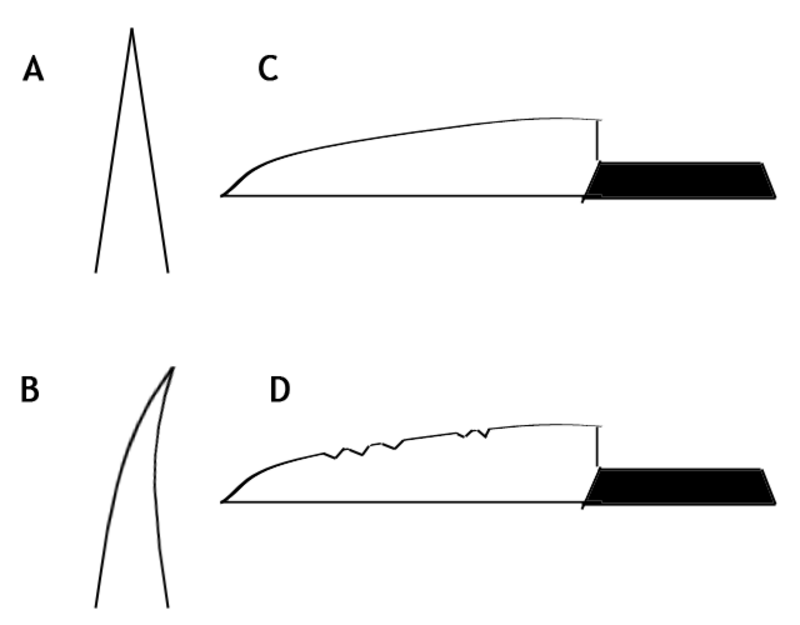
An edge can roll, wear, or chip. A suitable honing rod can help maintain some steel edges, but it cannot put missing metal back into a chip. Some hard, thin, or specialist blades are not suited to routine use on a steel rod, so check the knife maker’s guidance before choosing a maintenance tool.

Honing and sharpening are related but different jobs. A traditional steel mainly helps maintain or realign an edge; abrasive ceramic and diamond rods also remove metal. Sharpening removes material to form a new edge and can be done with suitable whetstones, guided systems, or professional equipment. It does not require a powered grinding wheel. Use light pressure and the angle recommended for your knife; an experienced sharpener is a good choice if the edge is badly damaged or you are unsure of the technique.
A useful knife is a combination of material, geometry, construction, and a comfortable fit in your hand. With those basics covered, Part II turns to the everyday knives and cutting boards that make a practical home kitchen.