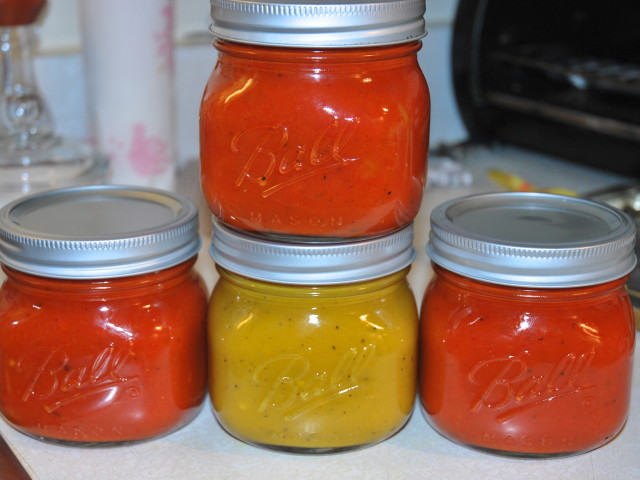
Recently I was trying to find a alternative to the tomato sauce I use for the pasta. The tomato sauce is fine, but it is used for the last years of my life and it is boring. Tomato is quite acidic and not as creamy as would like to be. So I thought about it and I found a few recipes for what I was looking for, and suddenly I found it. It is a combination of recipes I found on line, and recipe cooked for me long time ago from a dearest friend. So I did some changes and I made it. As you probably guessed by the title it is a sauce based on the roasted red bell peppers.
Bell pepper is a cultivar group of the species Capsicum annuum. Cultivars of the plant produce fruits in different colors, including red, yellow, green and orange. Bell peppers are sometimes grouped with less pungent pepper varieties as “sweet peppers”. Peppers are native to Mexico, Central America and northern South America. Pepper seeds were later carried to Spain in 1493 and from there spread to other European and Asian countries. Today, Mexico remains one of the major pepper producers in the world. The peppers come in different varieties in color and shape. The yellow, orange and red bell peppers are fleshier and sweeter than the other varieties used therefore in this dish.
The ingredients of the sauce are very simple and therefore the quality matters.

This is the general proportions of the sauce:
- 3 medium red (yellow or orange can do it perfectly)
- 1 large onion
- 3 gloves of garlic
- Red pepper flakes
- Olive oil
- salt
- pepper (piper nigrum)
- Pasta
- Capers

Start by washing the peppers.

Take a paper towel and add some olive oil.

Throughly coat the peppers with it. The oil is not for flavoring. It is mainly to bring high heat to the party. The water that is the natural ingredient of the peppers will evaporate at 212 F (100 C) and therefore the temperature that we get at, will be about 130 F (120 C). The oil will significantly raise the temperature and caramelize the sugars of the pepper.

Take the garlic with the peal on and wrap them loosely in aluminum foil to roast them as well.

Arrange them on a baking sheet and space them. Spacing them will allow the steam to evaporate and the prevent the peppers from being soggy. Use the peppers whole. You will see while in a minute.

Place them in the oven at 450 F (230 C) to cook them in very high temperature to burn them slightly and give them some smokey flavor.

Remove the top and the root part of it.

Cut it lengthwise.

Take one half of the onion and cut it vertically all the way to the root, but not until the end.

Then follow with horizontal cuts again completely but not all the way to the end. If you do, nothing will hold it together and it will fall apart.

Now follow with a small cut, to dice the onion.

Once done it you will have about 2 cups of finely diced onion.

The peppers should be roasted till they are quite black. This happens due to the high heat. If it is a low heat is used then the by the time they are black they will be totally dry too.

While hot, place them in metal bowl.

Cover them immediately with a plate. The steam that will be generated will just make the skin to detach.

Take the garlic also out of the oven. The peel will come right off.

While this is happening place a pan over medium heat and add two table spoons of olive oil.

Add the onion and follow with freshly ground pepper.

And season with olive salt. The salt will extract some from the moisture of the onion and cook it gently. In a covered pan always. You don ‘t want all this moisture to evaporate.

Add the red pepper flakes to taste.

Take the peppers and pinch them with a knife to drain the juice in a bowl. This is the reason that the peppers have to go in the oven whole. To keep the juice in side. First, the juices will make the oven messy and secondly we need it.

Just peel the skin off. Some parts will remain on the pepper specially burned segments. These will give the smokiness to the sauce.

Open it and remove the seeds and the stems.

Now take out Virginia (or whatever you call your blender).

Add the peppers in the canister.

Follow with the onions.

Add the juice that we saved from the peppers.

Now let’s review the options… Hmm… Liquify… I like that.

Watch the fun unfolding. Don ‘t overdo it. We need to liquify them not completely make them juice.

Now is time to taste. I need some salt. This is a base sauce so take it easy.

Bring a pot of water to a rolling boil.

Add salt and follow with the pasta.

Once done drain and return to the pot.

Add some of the sauce and cook over high heat to make sure that the pasta becomes sticky. That will make the sauce to hold a bit better on the pasta.

Mix the pasta with sauce.

Top it with the capers. These are not important but I don ‘t like the cheese and we need something salty to contrast the sweetness of the peppers.

Enjoy with a white cold wine…
So what do with the remaining sauce? What remaining sauce? Well you don ‘t think I used all the three peppers in one plate did you?

You can store in in a jar and it can last in the refrigerator for up to a month.

you can do the same with yellow peppers…

And since you are doing the work, don ‘t do three peppers. Use the proportion and upscale. You can mix the colors… Use it with chips (preferably home made). Or eat it with a spoon. It is a great sauce for everything. From pizza to pasta.



Leave a Reply